Sending Document Requests (Manual & Automatic)
One of the great features within Scarlett Mortgage this ability to automate sending document requests to your clients. This guide provides a step-by-step approach to send a request for documents through the Applicant Portal, review submitted documents, and ensure documents are automatically collected with every mortgage application.
Related Training
Video Walkthrough
Step-by-Step Guide
Sending a Document Request to Clients
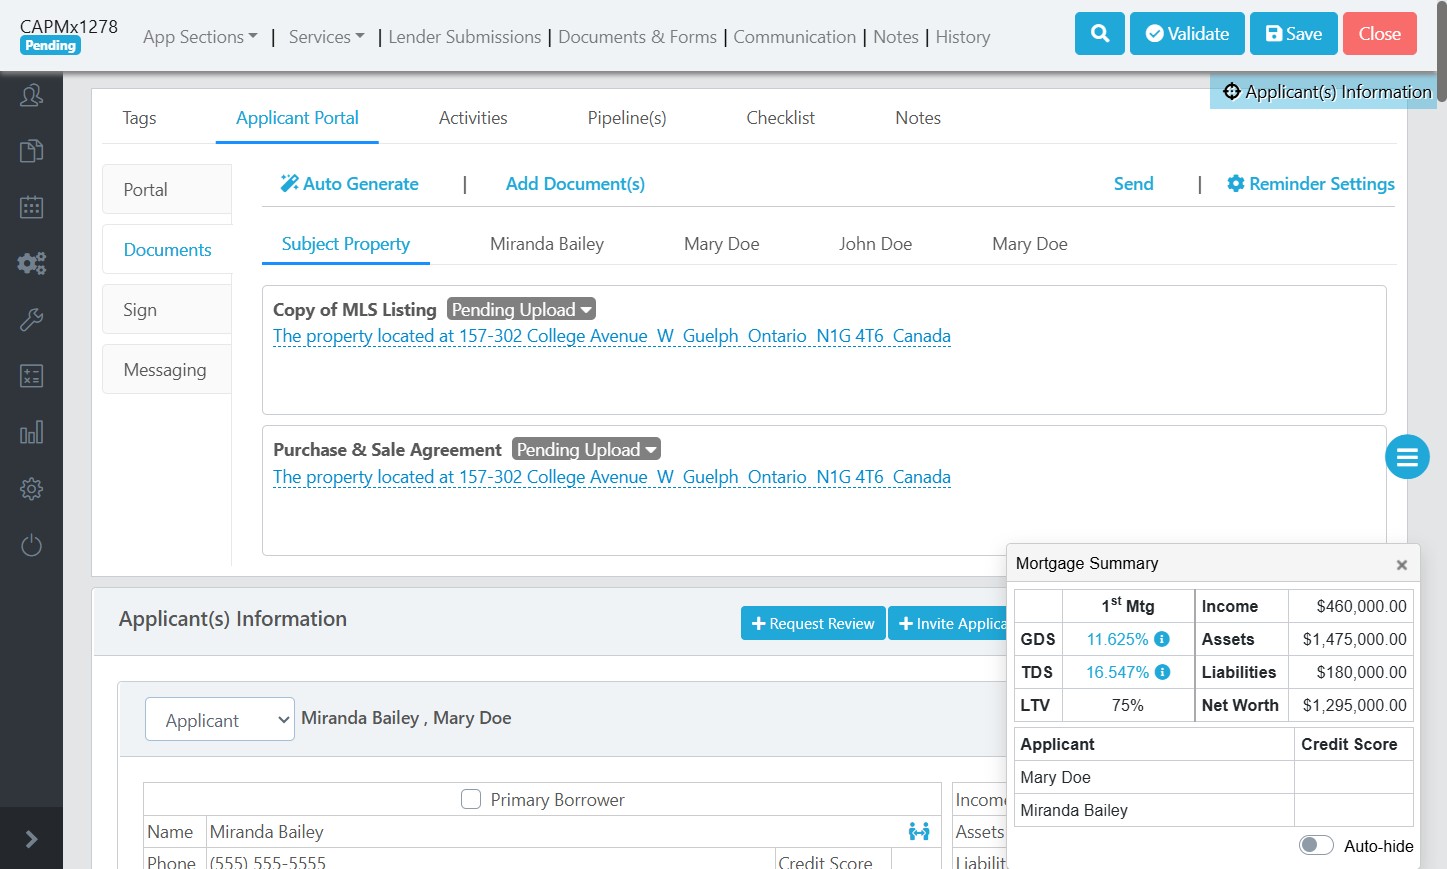
1) Within the deal, click on Applicant Portal.
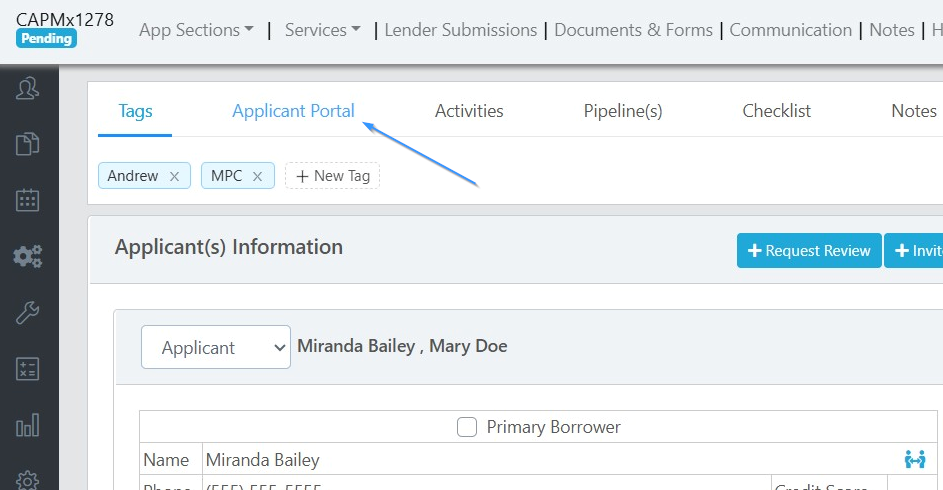
2) Click "Documents".
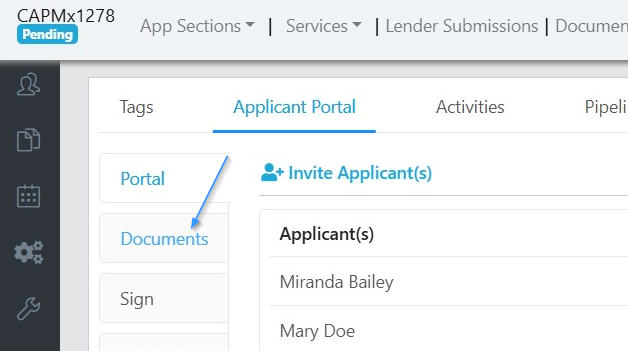
3) Here we have the option to create a document list manually by clicking "Add Documents", or we can have Scarlett do the work for us. Click "Auto Generate" to have the document list auto-populated based on the application contents and your auto-doc rules.
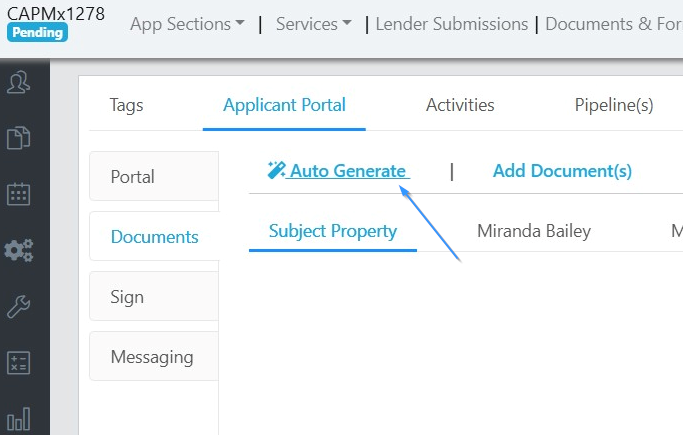
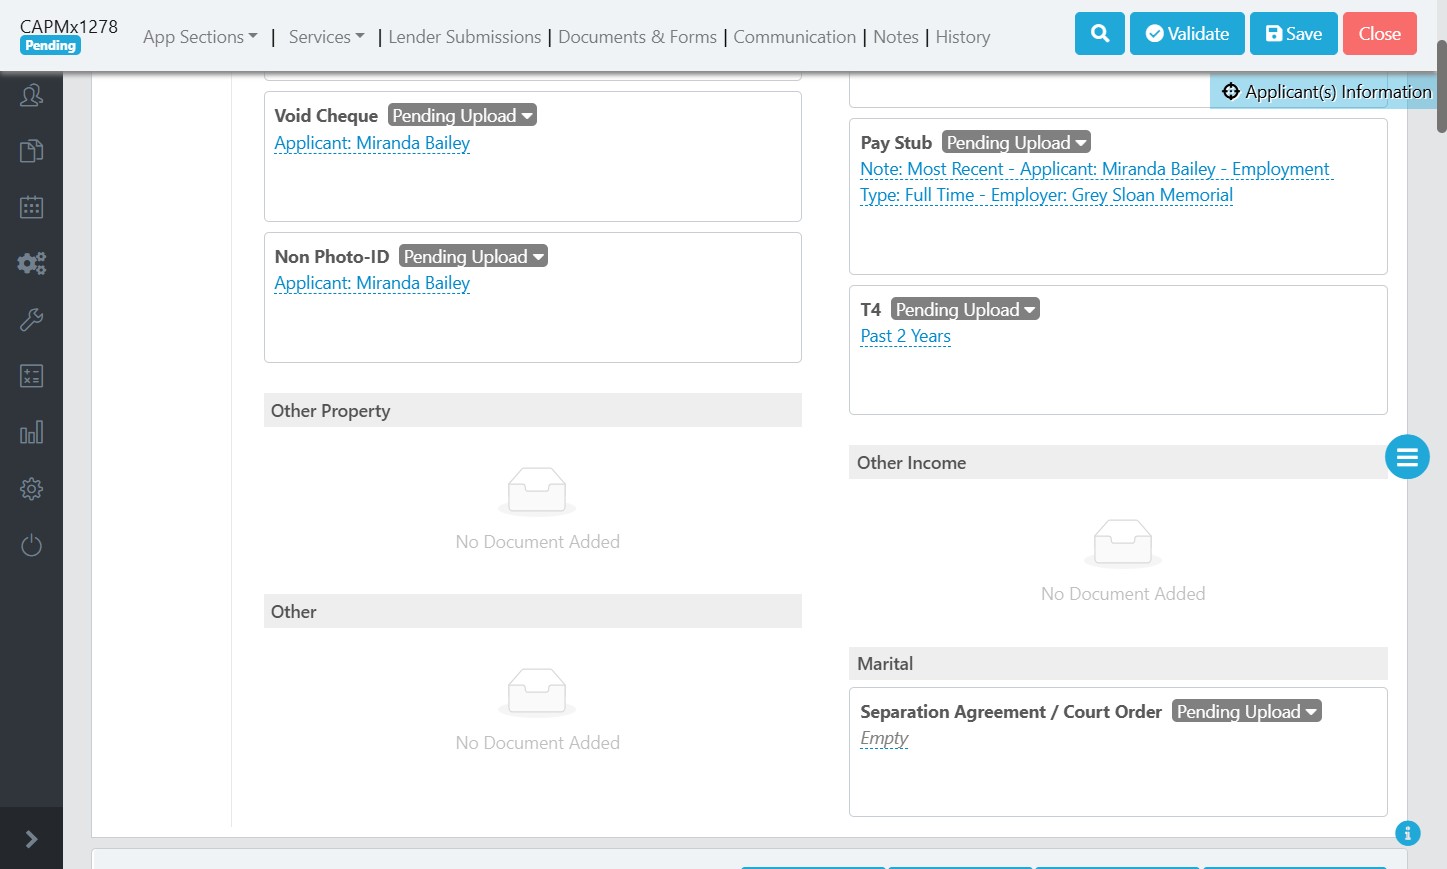
4) We can see that documents were automatically added under the subject property. Since this file is a purchase, it is requesting a copy of the APS and the MLS.
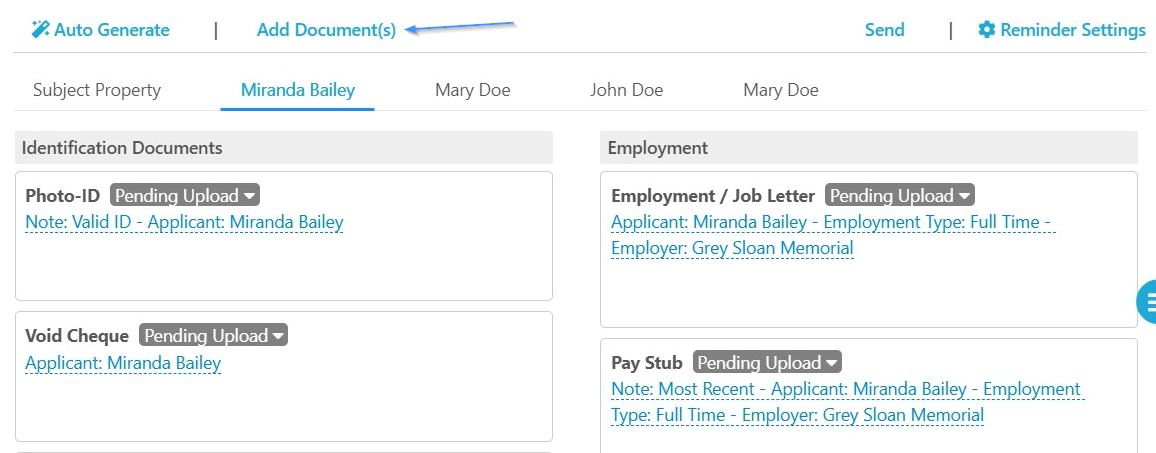
If we click on the applicant, Miranda Bailey, we can see that documents were requested based on her full time employment.

5) To add a document, click on "Add Document".
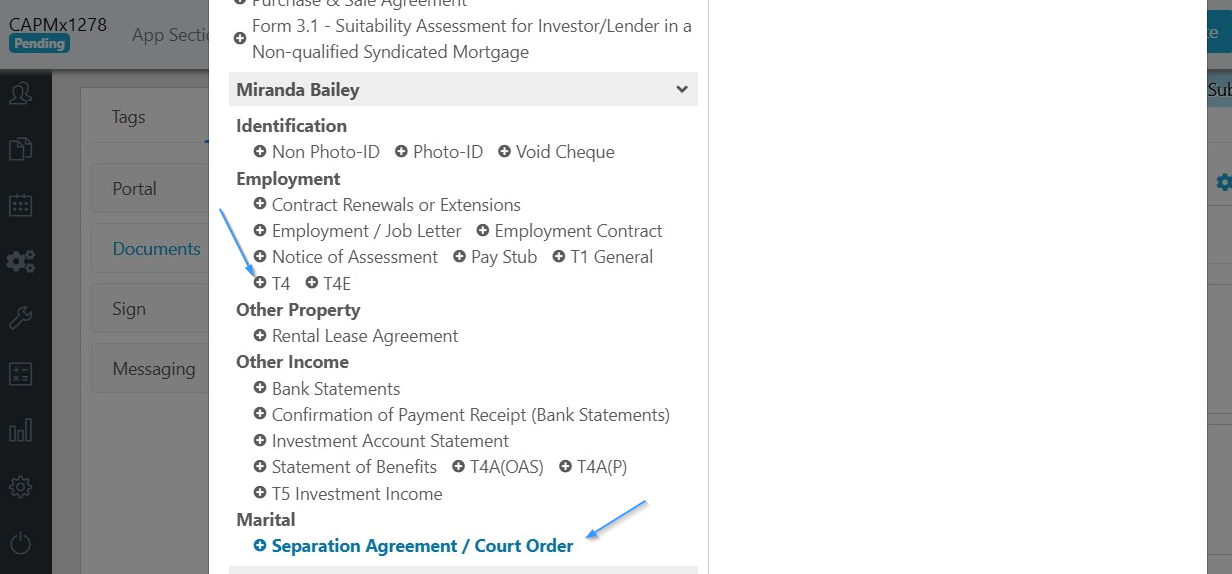
6) This launches the Add Document pop up window where you can select the document you wish to add to any of the tabs for subject property or applicant. Let's add a separation agreement and T4s for Miranda by clicking on those documents.
7) On the right side of the pop-up we can see the documents that will be added, and we can edit the notes that will appear with that document. We entered "Past 2 Years" for the note we want displayed next to the request for T4s.
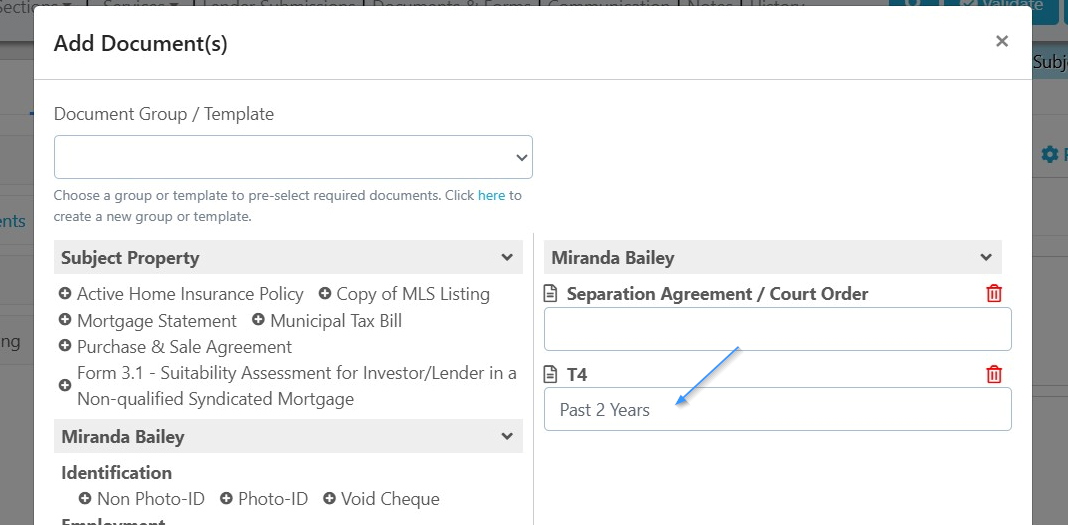
8) Once satisfied with the documents we want added to the request, click "Add Documents".

9) We can see these documents now listed under Miranda's tab, including the notes we entered.
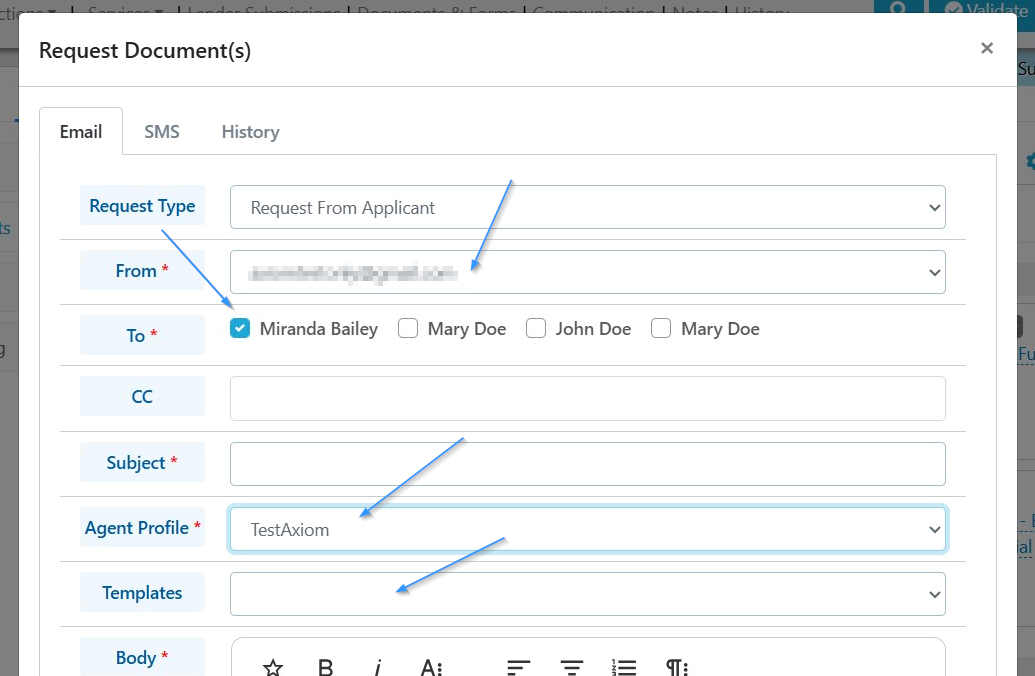
10) Now lets send the request. Click "Send" to start the process.

11) Select the email address you want to send from, check off the applicant(s) that you want the request to go to, and select your agent profile. You have the option to load a template you have written, or write the body of the email from scratch.
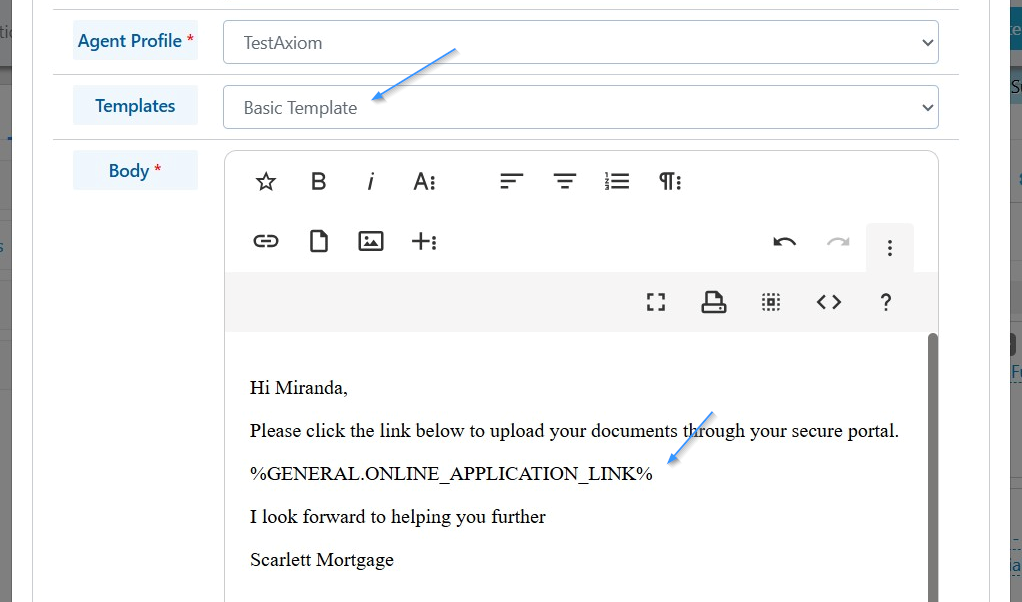
12) We've loaded a template we created called "Basic Template". As you can see, there is a short message requesting the client upload their documents, and it contains the merge field for our online application link. You can create your own template through the template builder.
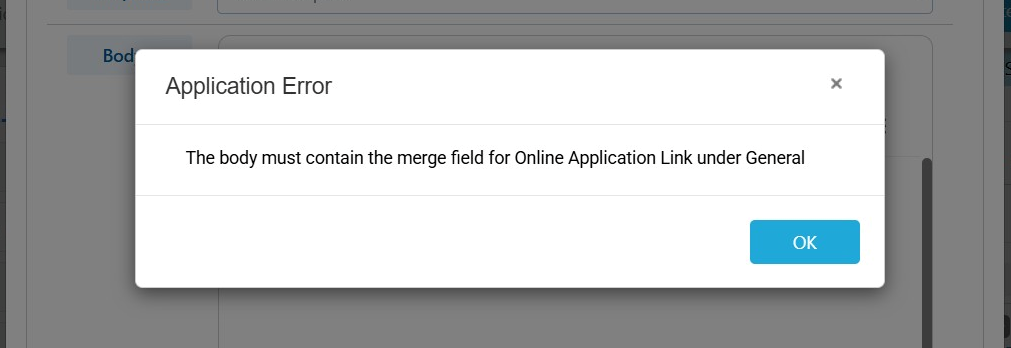
13) If we were to try to send this request without the merge field the system will stop us and prompt us to add it in.
14) Click "Send" to send the request to the client.

Documents Submitted through the Portal
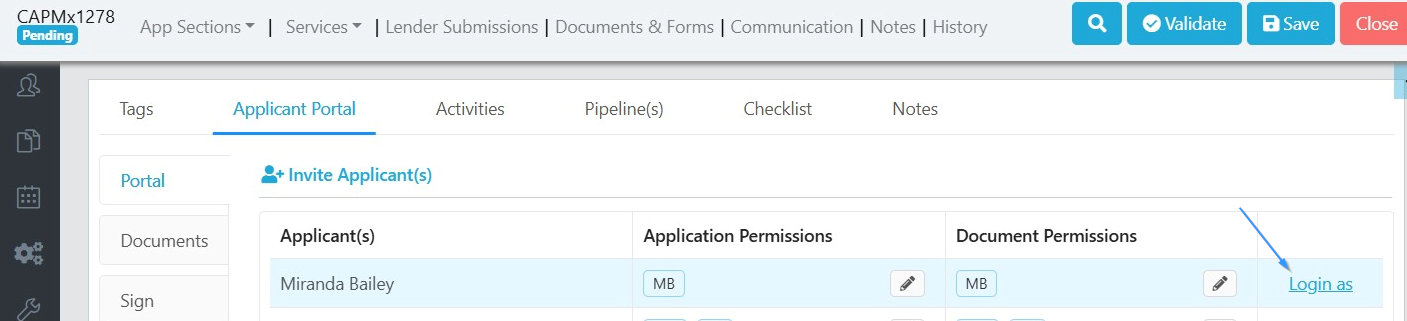
When you send a document request to a client they will receive an email with a link to your application portal. To see what they see, lets log in as the applicant, Miranda Bailey.
1) From within the deal, click on Applicant Portal, and then click on "Login as"
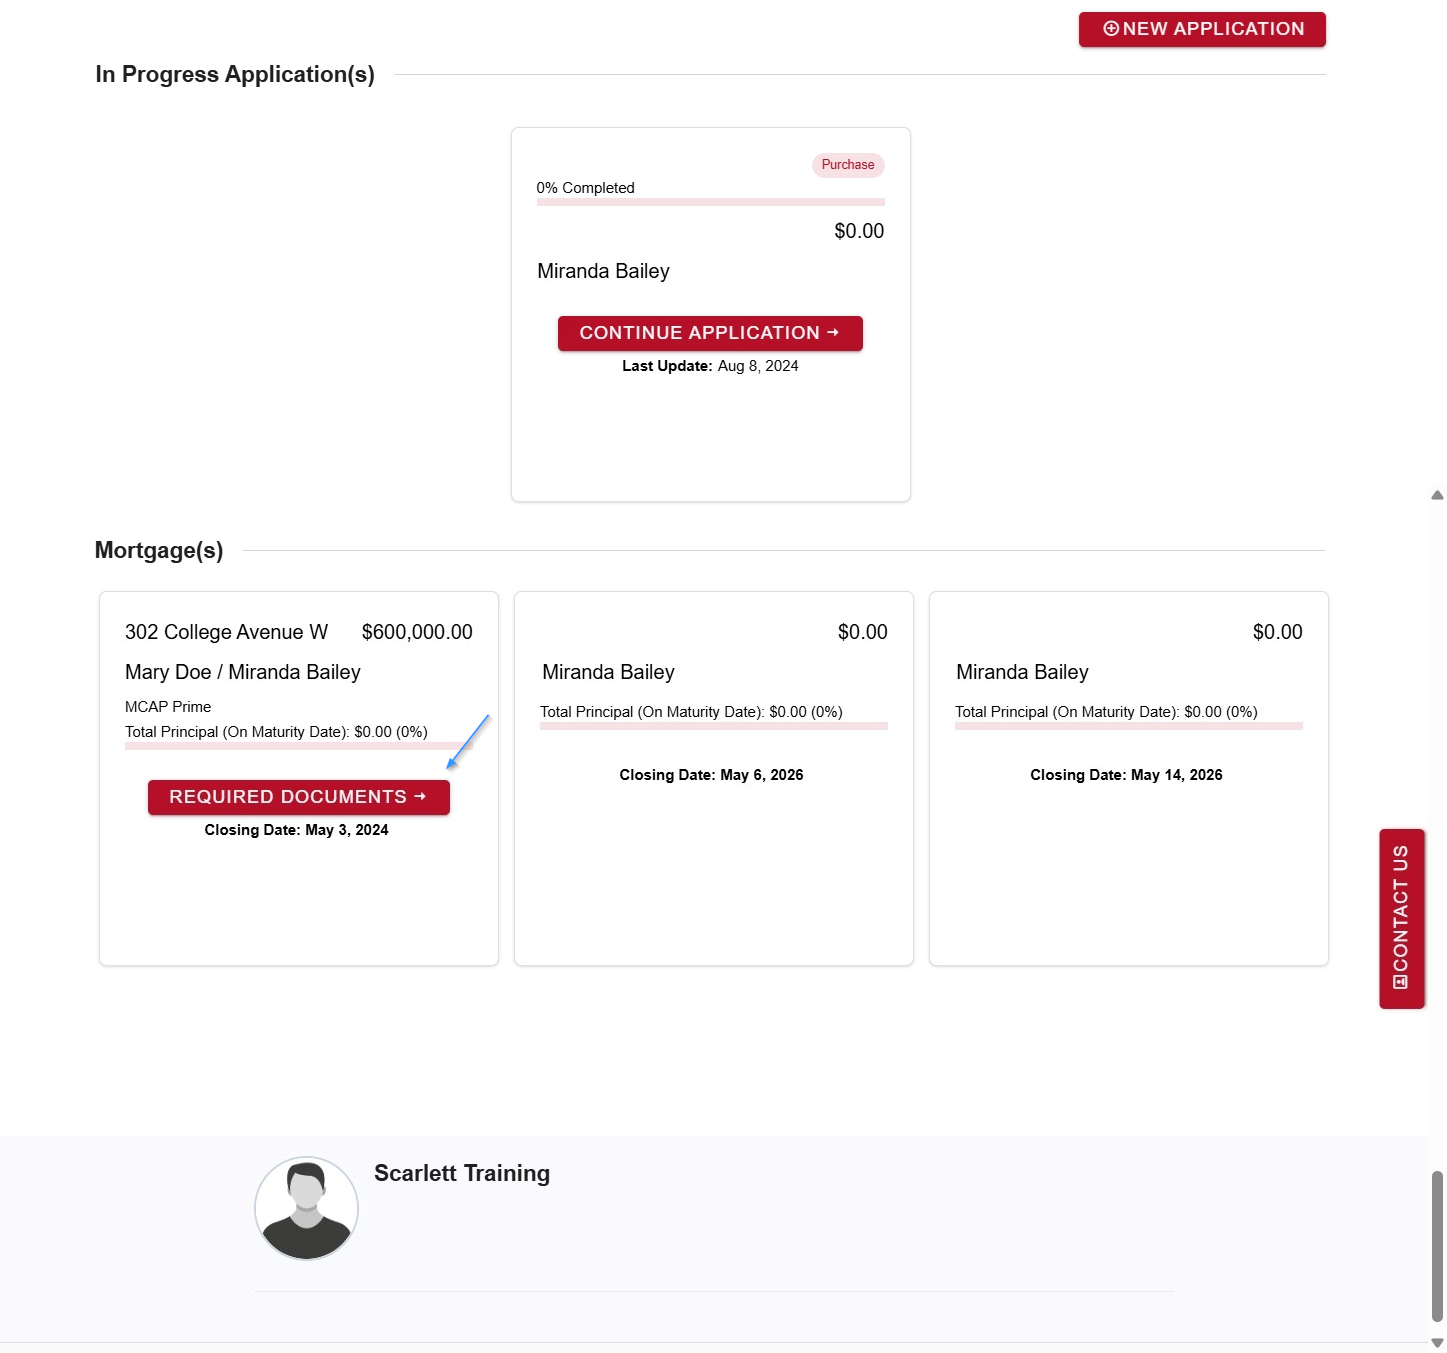
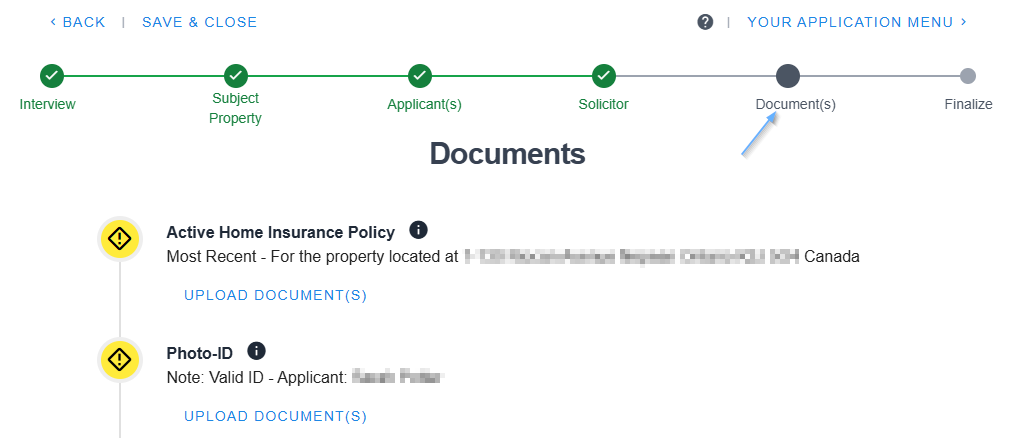
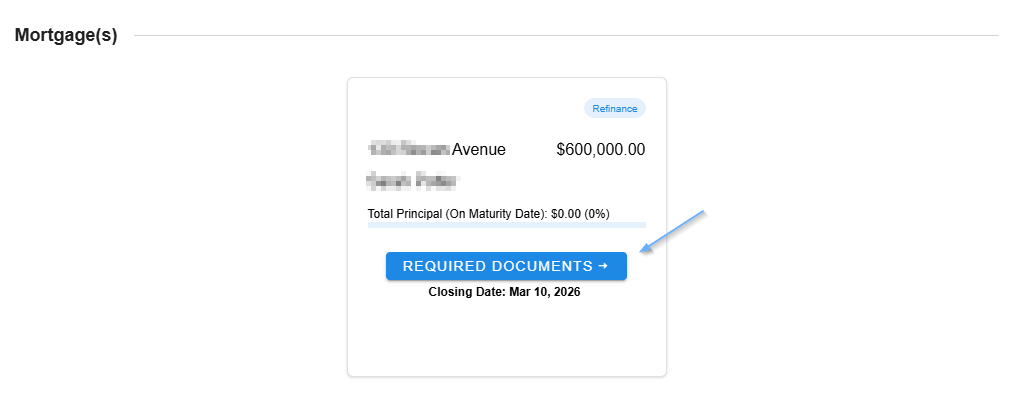
2) In the applicant portal, Miranda would see any applications she hasn't yet submitted under "In Progress Application(s)", and any submitted applications under "Mortgages". On the deal where we requested documents, Miranda can now click on "Required Documents".
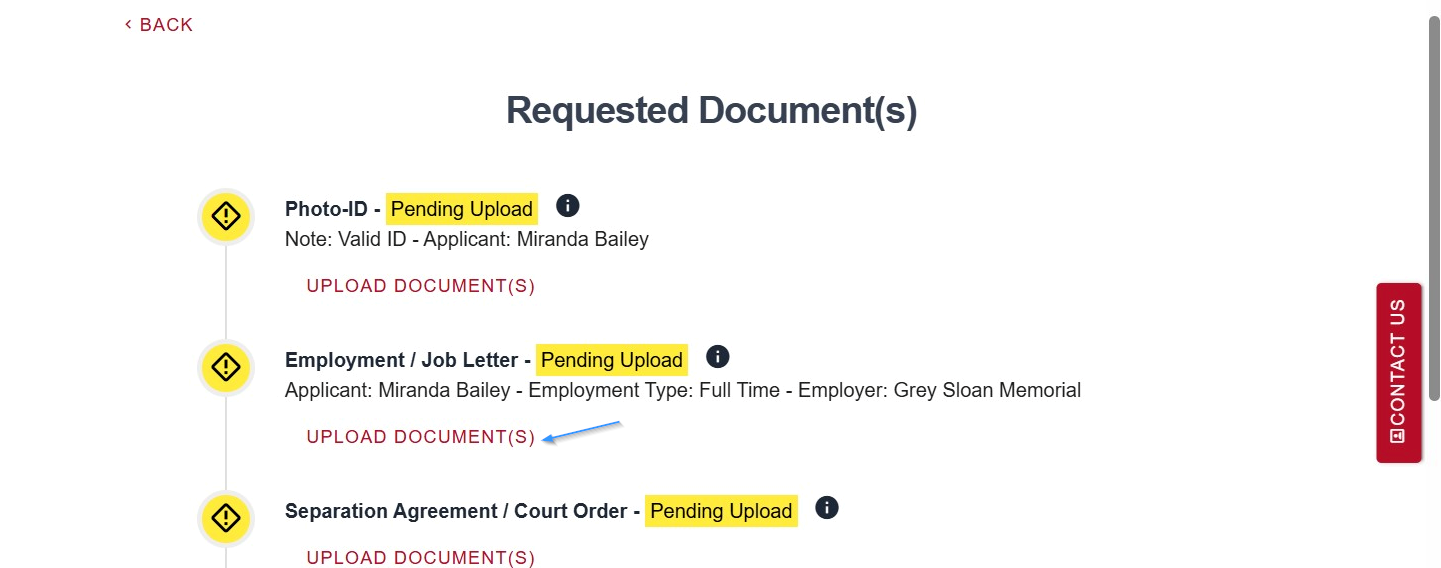
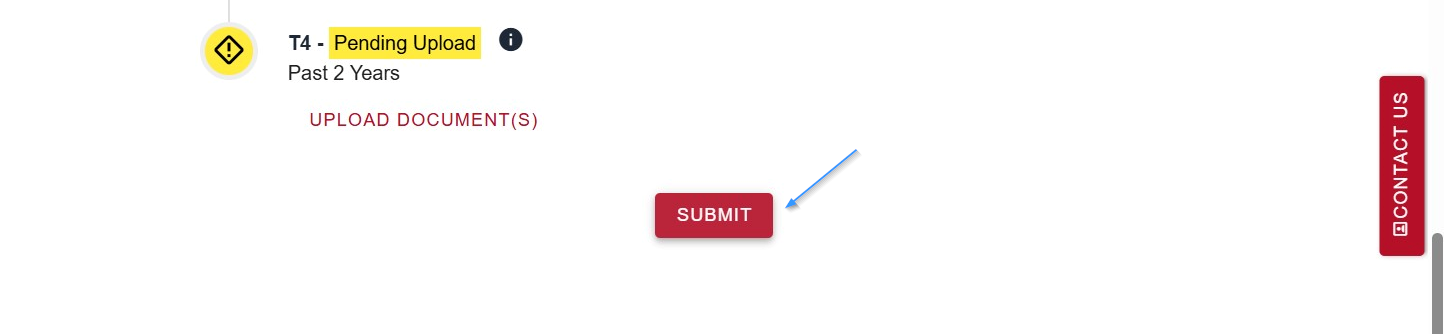
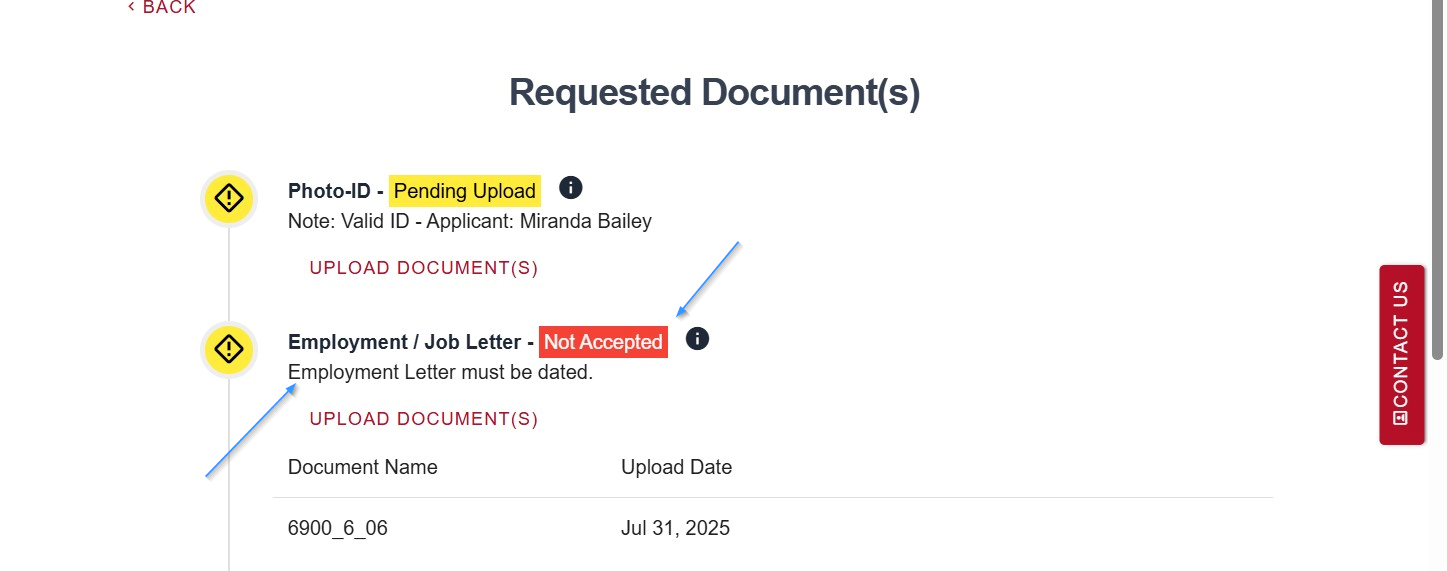
3) Requested documents show up as yellow. Lets click on "Upload Document(s)" under the Employment / Job Letter request.
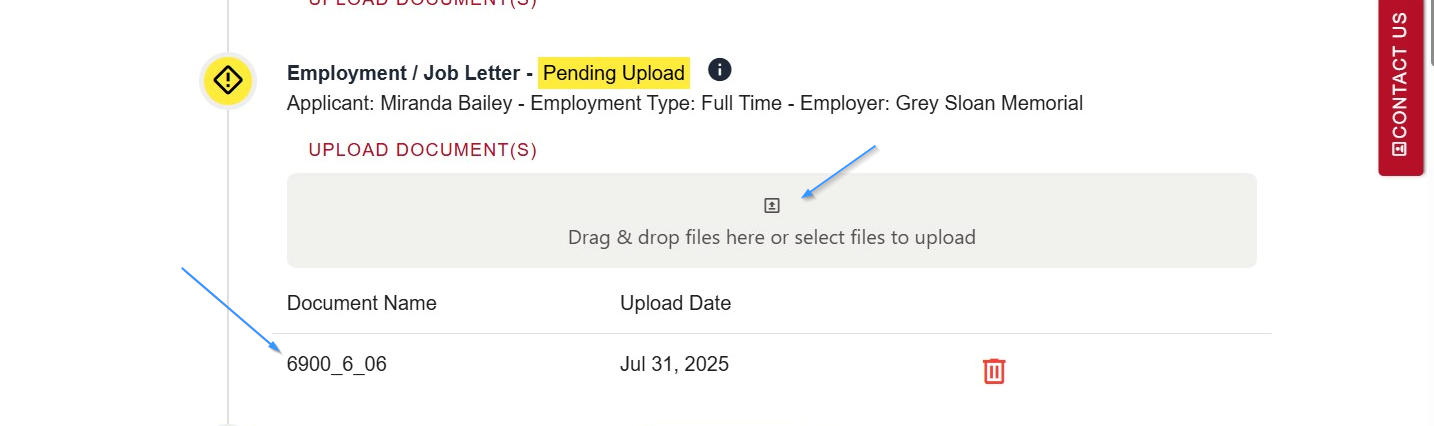
4) Miranda can then drag & drop or click to select files for upload. Once uploaded, they show up underneath the request.
5) When Miranda has added all the documents she has available, she then clicks "submit".
6) If Miranda goes back into her document portal, she will see the documents uploaded have changed to orange and are indicated as Uploaded / Received by Agent. The ability for her to delete the document is now gone.

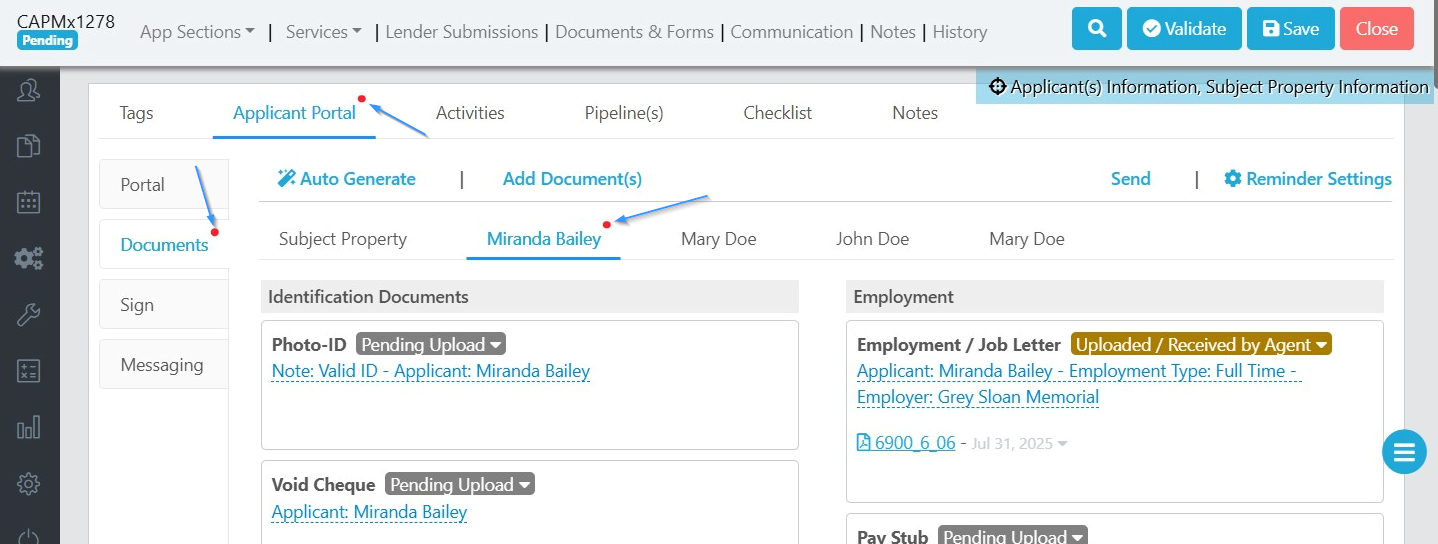
7) Back on the agent side, you will have gotten an email notifying you that documents were uploaded. Within the deal, red dots appear to show you where there are new documents for review.
When we follow the dots, we see the Employment / Job Letter has the status "Uploaded / Received by Agent" and the document is listed available for preview.
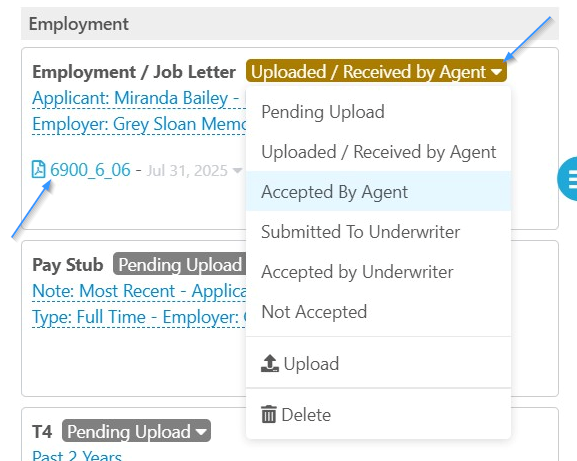
8) Click on the document uploaded to preview it, and then click on the document status to change the status in the dropdown. Within this dropdown we can also upload a document we already have for this category or delete this document type from the list of requested documents.
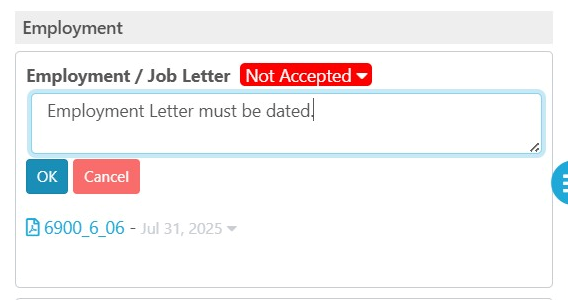
9) We clicked "Not Accepted" and then clicked the notes about the document to update with a reason for the rejection. In this case Miranda's employment letter was not dated.
10) When Miranda logs in to her portal, she would now see that status has changed to "Not Accepted" and has the explanation as to why. She can repeat the document upload process to send us a new document.
You would repeat this process until all documents are submitted by the client and accepted.
Turning on Automated Document Requests
Another great feature within Scarlett Mortgage is the ability to totally automate document requests to your clients.
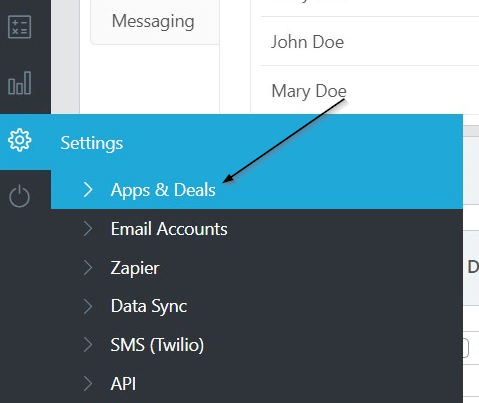
1) In the deal dashboard go to the Settings tab on the left side and select App & Deals.
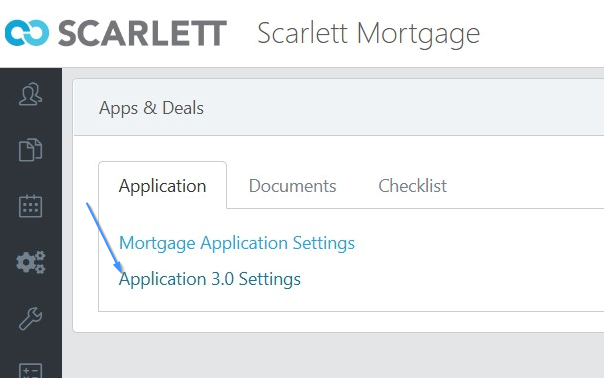
2) Click "Application 3.0 Settings"
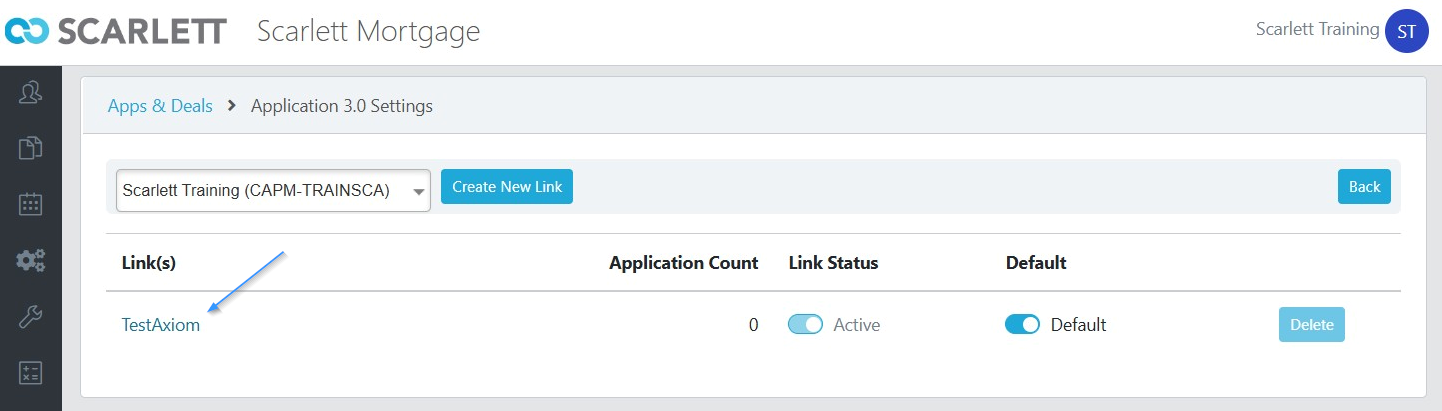
3) Select your application link that you want to automatically collect documents.
There are two different options for document collection. We'll discuss each of them below.
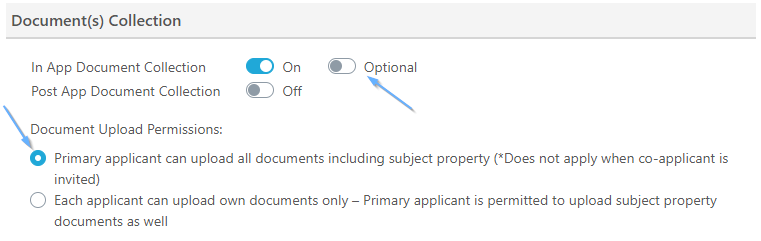
In App Document Collection
This offers your clients the option to upload their documents during the application process. Once they have completed the interview portion of the application, the document portal will open and they can upload documents they have on hand before hitting the finalize button.
Agents who select this option believe that their clients typically are reviewing the documents to provide the answers within the application, and so have the documents readily available at this time. In this case it makes sense to collect them while they have already located them.
1) To select this option, under "Document(s) Collection, toggle on "In App Document Collection"

2) By default, the system is set to allow them to submit the application without having all documents attached. If you want to require all documents before allowing submission, toggle the "Optional" over to "Required".
3) Select whether you want the primary applicant to have the ability to upload all documents, or whether you want each applicant to be limited to their own documents only.
Don't forget to save your new selections.
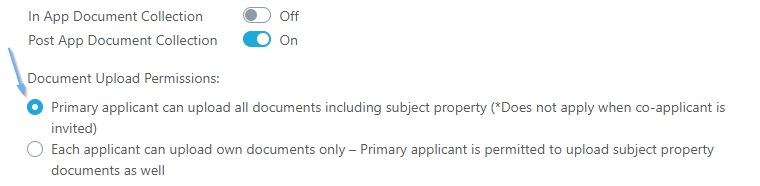
Post App Document Collection
Selecting this option allows your client to submit the application without viewing a document request list.

Upon completion of the application their dashboard will still show the "Required Documents" button if auto-docs are turned on, but this appears after the application submission in the workflow.
Agents who select this option believe that document collection is of secondary importance to getting the completed application in. They don't want to deter someone from hitting the submit button by showing a list of documents needed.
1) To select this option, under "Document(s) Collection, toggle on "Post App Document Collection"

3) Select whether you want the primary applicant to have the ability to upload all documents, or whether you want each applicant to be limited to their own documents only
Don't forget to save your new selections.